The Sipwise C5 provides the capabilities for normal call forwarding (deflecting a call for a local subscriber to another party immediately or based on events like the called party being busy or doesn’t answer the phone for a certain number of seconds) and serial call hunting (sequentially executing a group of deflection targets until one of them succeeds). Targets can be stacked, which means if a target is also a local subscriber, it can have another call forward or hunt group which is executed accordingly.
Currently 7 different types of Call Forward are available in Sipwise C5:
Call Forward Unconditional (CFU): The call forward is always executed, completely disregarding the subscriber state.
Call Forward Busy (CFB): The call forward is executed when the subscriber returns a busy state.
Call Forward Timeout (CFT): The call forward is executed when no answer is received from the subscriber before the timeout expiration. Timeout is configurable in ringtimeout subscriber preference.
Call Forward Unavailable (CFNA): The call forward is executed when the subscriber has no endpoint registered.
| The Call Forward Unavailable is also executed if the callee responds with 480 Temporarily Unavailable, which may be the case when a subscriber’s endpoint (e.g. an IP-PBX) is registered but the callee user is not available. |
Call Forward SMS (CFS): The SMS forward is always executed, completely disregarding the subscriber state. SMS service has to be enabled, see the SMS (Short Message Service) subchapter for a detailed description on how to activate it.
Call Forward on Response (CFR): The call forward is executed only for particular reply codes received back from the destination endpoint. The list of the reply codes and the activation mode can be configured in rerouting_codes and rerouting_mode subscriber’s preferences. Example: suppose that rerouting_codes is set to 503, rerouting_mode to whitelist and the CFR is configured. If that subscriber receives a call and it replies back a with code 503, then the call will be re-routed to the destination configured in the CFR. For all the other reply codes the CFR will be NOT executed.
Call Forward on Overflow (CFO): The call forward is executed when the new incoming call for the subscriber exceeds the limit configured in concurrent_max_in_total, concurrent_max_in or concurrent_max_in_per_account subscriber’s preferences. If none of the preferences is set then the CFO will be NOT executed.
| Starting from mr7.2.1 release, Call Forward on Response (CFR) has to be configured on the callee subscriber (in previous versions the preference was associated to the caller subscriber). When the destination endpoint replies back with an error code, this will be matched with the one listed in the rerouting_codes and rerouting_mode callee’s preferences. |
Go to your Subscriber Preferences and click Edit on the Call Forward Type you want to set (e.g. Call Forward Unconditional).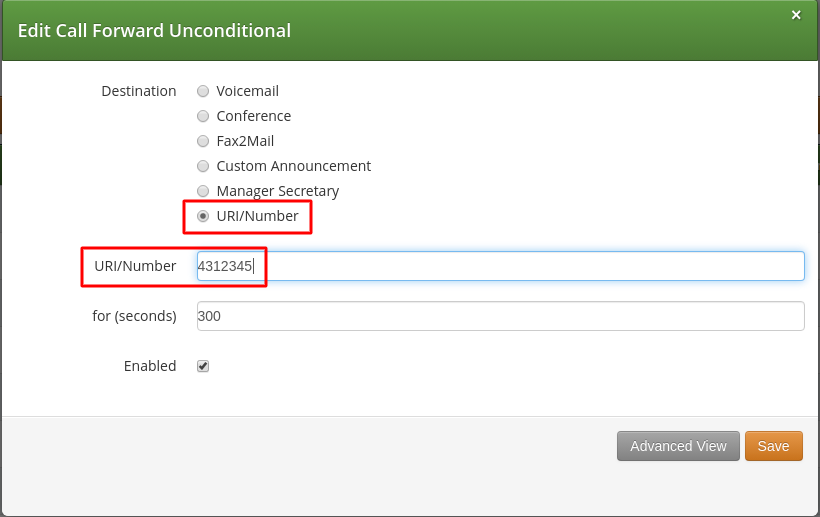
If you select URI/Number in the Destination field, you also have to set a URI/Number. The timeout defines for how long this destination should be tried to ring.
Voicemail: Calls are forwarded to the Voicemail Application Server where the caller can leave a message.
Conference: Calls are forwarded to the conference room. The subscriber is the host of the conference.
Fax2Mail: Calls are forwarded to the Fax Server and the caller is supposed to leave a fax message. Note: The Fax2Mail feature must be enabled in the subscriber’s preferences.
Custom Announcement: A custom announcement is played back to the caller. Select an announcement from the Custom announcement list.
Manager Secretary: Calls are forwarded to numbers defined in the "manager_secretary_numbers" subscriber preference. The "manager_secretary" feature must be enabled.
URI/Number: The call is forwarded to the provided SIP-URI string or a number (See the Call Forward Destination Extra Parameters section below).
URI/Number: A destination to forward calls to. This option is only valid for the URI/Number destination type. Specify a valid SIP-URI string or a plain number.
for (seconds): Sets the ringing time, after which the call is forwarded to the next number on the list (if configured).
Custom Announcement: Custom Announcements are created in Sound Sets and must have the name like 'custom_announcement_0', where the trailing symbol is a digit from 0 to 9.
Enabled: Defines whether the Call Forward rule is being used or not.
Beside call forwarding to a single destination, Sipwise C5 offers the possibility to activate call forwarding in a more sophisticated way:
to multiple destinations (→ Destination Set)
only during a pre-defined time set (→ Time Set)
only for specific callers (→ Source Set)
only for specific callee (→ B-Number Set)
If you want to define such more detailed call forwarding rules, you need to change into the Advanced View when editing your call forward. There, you can select multiple Destination Set - Time Set - Source Set - B-Number Set groups that determine all conditions under which the call will be forwarded.
Explanation of call forward parameters
A Destination Set is a list of destinations where the call will be routed to, one after another, according to the order of their assigned priorities. See the Destination Sets subchapter for a detailed description.
A Time Set is a time period definition, i.e. when the call forwarding has to be active. See the Time Sets subchapter for a detailed description.
A Source Set is a list of number patterns that will be matched against the calling party number; if the calling number matches the call forwarding will be executed. See the Source Sets subchapter for a detailed description.
A B-Number Set is a list of number patterns that will be matched against the called party number; if the callee number matches the call forwarding will be executed. See the B-Number Sets subchapter for a detailed description.
Click on Manage Destination Sets to see a list of available sets. The quickset_cfu has been implicitly created during our creation of a simple call forward. You can edit it to add more destinations, or you can create a new destination set.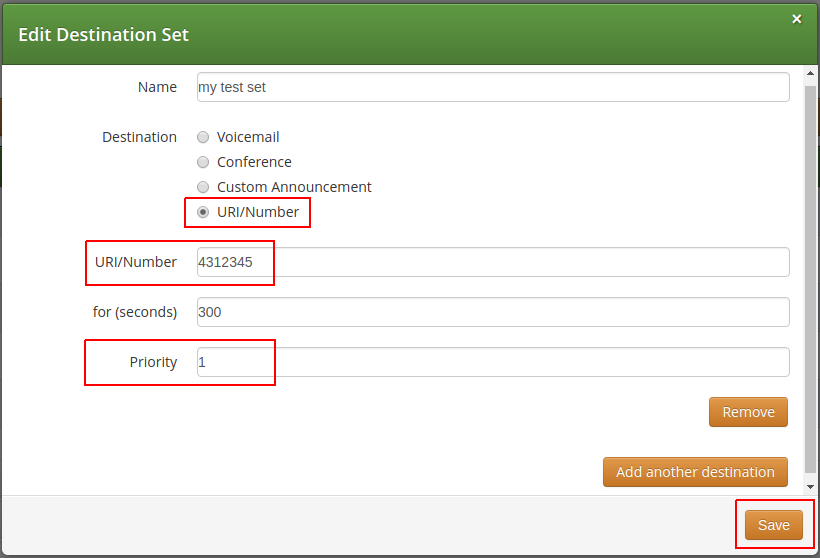
When you close the Destination Set Overview, you can now assign your new set in addition or instead of the quickset_cfu set.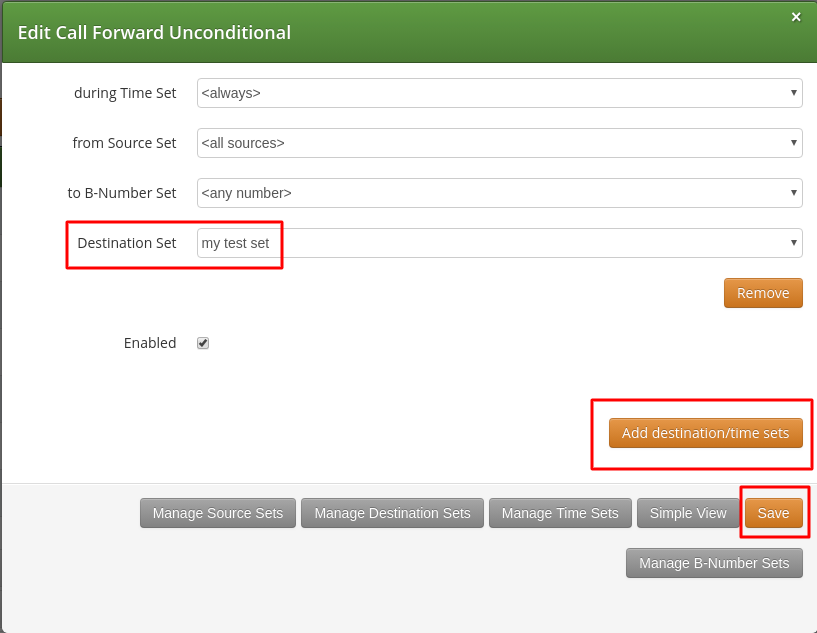
Press Save to store your settings.
Click on Manage Time Sets in the advanced call-forward menu to see a list of available time sets. By default there are none, so you have to create one.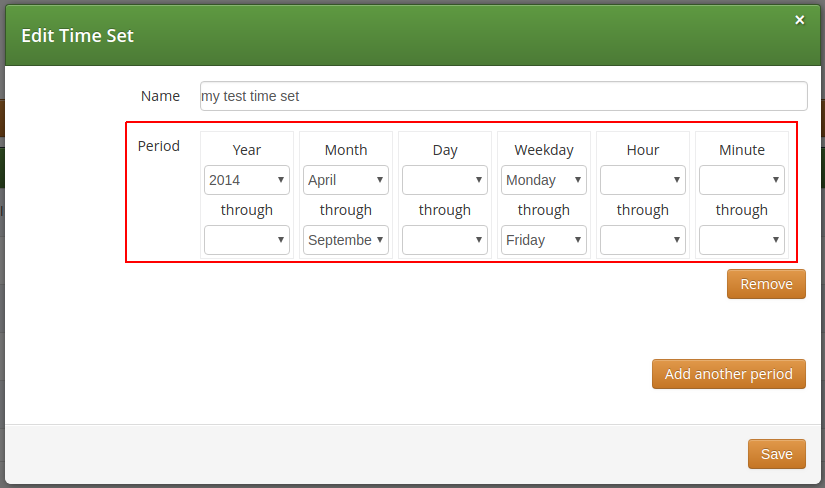
You need to provide a Name, and a list of Periods where this set is active. If you only set the top setting of a date field (like the Year setting in our example above), then it’s valid for only this setting (like the full year of 2013 in our case). If you provide the bottom setting as well, it defines a period (like our Month setting, which means from beginning of April to end of September). For example, if a CF is set with the following timeset: "hour { 10-12 } minute { 20-30 }", the CF will be matched within the following time ranges:
from 10.20am to 10:30am
from 11.20am to 11:30am
from 12.20am to 12:30am
| the period is a through definition, so it covers the full range. If you define an Hour definition 8-16, then this means from 08:00 to 16:59:59 (unless you filter the Minutes down to something else). |
If you close the Time Sets management, you can assign your new time set to the call forwards you’re configuring.
Once the Advanced View of the call forward definition has been opened, you will need to press the Manage Source Sets button to start defining new Source Sets or managing an existing one. The following image shows the Source Set definition dialog: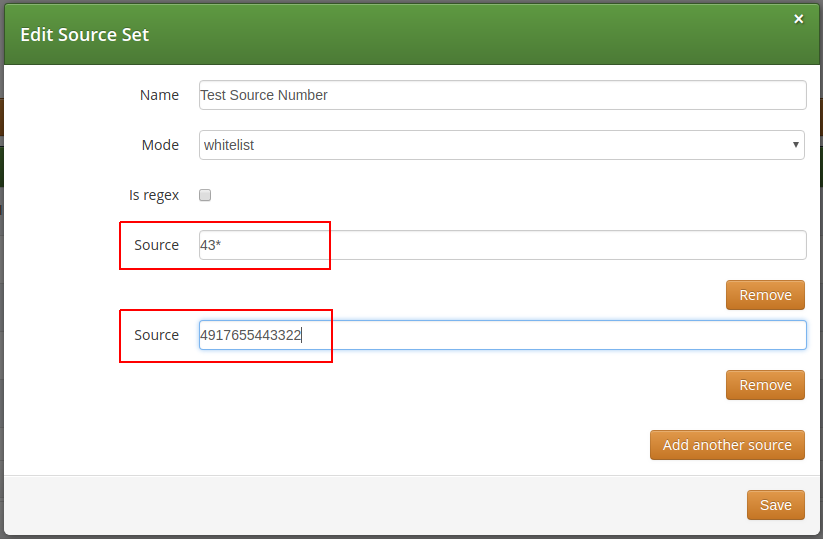
Figure 10. Creating a Call Forward Source Set
You will need to fill in the Name field first, the Mode: whitelist or blacklist, the is_regex flag and finally in the Source field you can enter:
A simple phone number in E.164 format
A pattern, in order to define a range of numbers. You can use "*" (matches a string of 0 to any number of characters), "?" (matches any single character), "[abc]" (matches a single character that is part of the explicitly listed set: a, b or c) and "[0-9]" (matches a single character that falls in the range 0 to 9) as wildcards, as usual in shell patterns. Examples:
"431*" (all numbers from Vienna / Austria)
"49176[0-5]77*" (German numbers containing fixed digits and a variable digit in 0-5 range in position 6)
"43130120??" (numbers from Vienna with fixed prefix and 2 digits variable at the end)
A perl compatible regular expressions (only if is_regex if set). Capturing groups can be formed using parentheses and referenced in the Destination Set via \\1, \\2,…
The constant string "anonymous" that indicates a suppressed calling number (CLIR)
You can add more patterns to the Source Set by pressing the Add another source button. When you finished adding all patterns, press the Save button. You will then see the below depicted list of Source Sets:
Figure 11. List of Call Forward Source Sets
Once the Advanced View of the call forward definition has been opened, you will need to press the Manage B-Number Sets button to start defining new B-Number Sets or managing an existing one. The following image shows the B-Number Set definition dialog: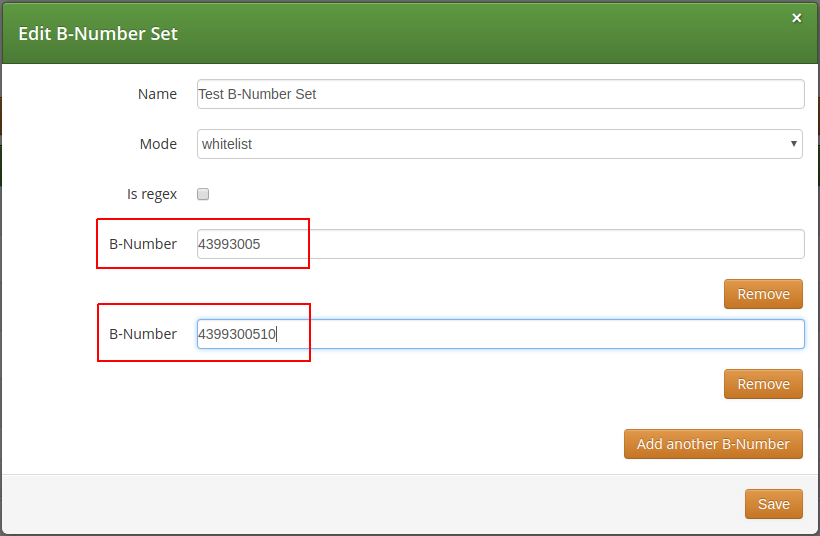
Figure 12. Creating a Call Forward B-Number Set
You will need to fill in the Name field first, the Mode: whitelist or blacklist, the is_regex flag and finally in the B-Number field you can enter:
A simple phone number in E.164 format
A pattern, in order to define a range of numbers. You can use "*" (matches a string of 0 to any number of characters), "?" (matches any single character), "[abc]" (matches a single character that is part of the explicitly listed set: a, b or c) and "[0-9]" (matches a single character that falls in the range 0 to 9) as wildcards, as usual in shell patterns. Examples:
"431*" (all numbers from Vienna / Austria)
"49176[0-5]77*" (German numbers containing fixed digits and a variable digit in 0-5 range in position 6)
"43130120??" (numbers from Vienna with fixed prefix and 2 digits variable at the end)
A perl compatible regular expressions (only if is_regex if set). Capturing groups can be formed using parentheses and referenced in the Destination Set via \\1, \\2,…
You can add more patterns to the B-Number Set by pressing the Add another B-Number button. When you finished adding all patterns, press the Save button. You will then see the below depicted list of B-Number Sets: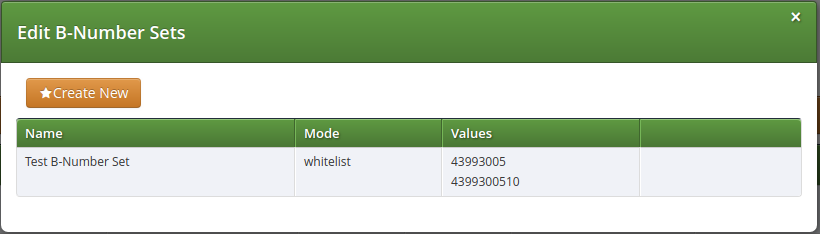
Figure 13. List of Call Forward B-Number Sets
As additional step you can define a Destination Set as described in Destination Sets subchapter. For our example, we have defined the following Destination Set:
Figure 14. List of Call Forward Destination Sets
A final step of defining the call forward settings is selecting a Destination, a Time Set, a Source Set and a B-Number Set, as shown in the image below. Please note that there is no specific Time Set selected in our example, that means the call forward rule is valid (as shown) <always>.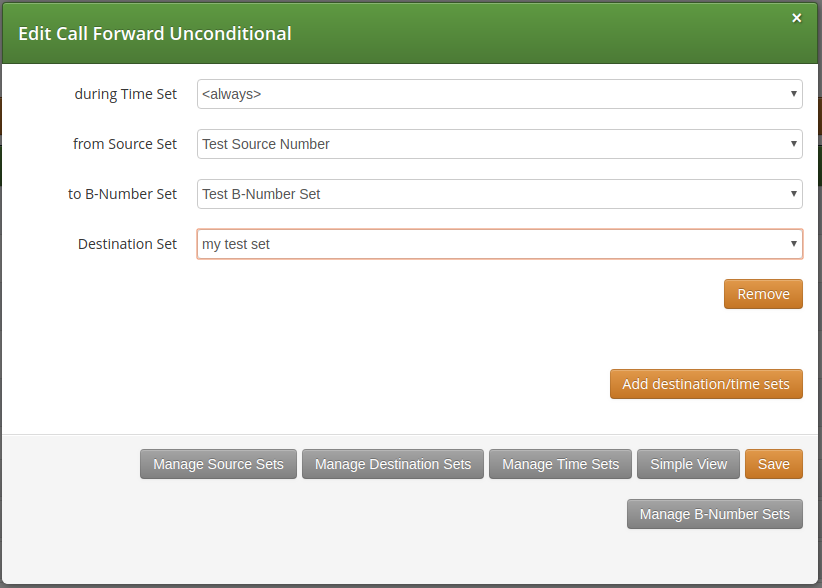
Figure 15. Definition of a Call Forward with Source and Destination Sets
Once all the settings have been defined and the changes are saved, you will see the call forward entry (in our example: Call Forward Unconditional), with the names of the selected Destination, Time Set, Source Sets and B-Number Set provided, at SubscriberPreferences → Call Forwards location on the web interface: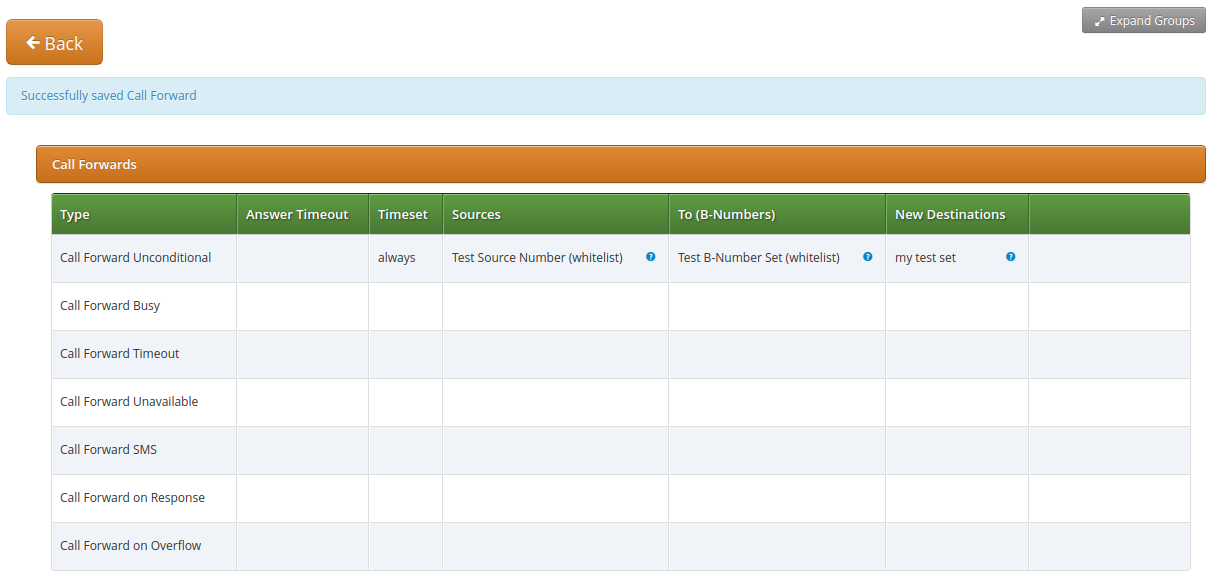
Figure 16. List of Call Forward with Source and Destination Sets